As an Amazon Associate we earn from qualifying purchases.
Gun cabinets are proficient at providing a safe location for your firearms. However, the retail price for these tools is expensive. If you’re a gun owner who has some time on their hands, continue reading. I want to help you build your own gun cabinets.
Throughout this post, I’ll discuss seven steps to help you create a DIY Gun Cabinet. It will take a few hours, but the reward pays off. You’ll have a fully functional gun cabinet by following these steps correctly.
Contents
Why Make a DIY Gun Cabinet
Responsible gun ownership is an often overlooked requirement that should come with acquiring guns. The same way people like to fill their own ammo, creating your own gun case is one of the best ways to secure your weapons. It prevents unwanted consequences and gives you confidence in the safety of yourself, family, and possessions.
Customization
Since you’re making your own gun cabinet, you get to pick how big or small it’s going to be. You can make one with exactly enough compartment space for the guns you already have and plan to acquire, if any.
While the store-bought alternatives could do the job, they might not fit your exact needs in aesthetic. The bulky options could just take up valuable space. There are various versions of gun cabinets that you can make to fit your taste:
- Wooden gun cabinet
- Hidden gun cabinet
- Glass-front gun cabinet
- Wall Gun Cabinet
- Rifle cabinet plans (with a used rack or repurposed cabinet)
Personalized Gun Holder
With a DIY gun cabinet, you’ll be able to make a holder for exactly the types of guns you have. Whether it’s a pistol, an airgun, a rifle, or a shotgun, you can store them side by side by creating specific holders for each in your DIY cabinet.
Focused Function
When it comes to a gun case, you might have a particular purpose in mind. These can range from protection from kids or coverage from guests and intruders. When you do it yourself, you can focus its function to your intended purpose for it.
Certain features can be added in to make it childproof the same way as when you make drawers and other cabinets in the house unopenable by children. You can also adjust the door or cover so that the guns will be concealed from sight.
Law Enforcement
A DIY gun case ensures you satisfy the particular legal requirements of the state for storing weapons, which can be different depending on where you live. Some states have strict rules especially when there are kids in the house.
If you’re especially gifted in locksmith skills, you will be able to create your own locking system. This makes your guns inaccessible to children and other unauthorized people.
How to Build a Gun Cabinet
Throughout this post, I outlined the seven steps to building a DIY Gun Cabinet. It will take some time, but the aesthetically pleasing and personalized gun cabinet will be a rewarding pay-off. You’ll have a fully functional gun cabinet by following these steps correctly.

Step 1: Plan Out Your Cabinet
For this tutorial, I’ll be making a wooden gun cabinet best suited for rifles or guns with long barrels. Planning it out means laying out the pieces that you will use to their exact measurements and figuring out where each will be positioned.
Specify the kind of wood and other materials to be used. Make sure you understand how the components will be put together, which you’ll know as you read along. Make sure you’ve gone through every step here first — no details missed — before attempting to do anything.
What You’ll Need
You’re going to need a few materials before you make a gun case that’ll match the other highly rated firearm storage cabinets on the market. Gather these materials to ensure a successful DIY project.
The items you’ll need are:
- Pencil
- Electric Screwdriver
- Tape measure
- Saw
- Drill Bits
- Electric Drill
- Multiple 1-inch plywood sheets
- Padlocks
- Latch
- Glass Retainer Clips
- Knobs
- Sanding Paper
- Galvanized steel screws
- Hinges
- ¼-inch plexiglass
- Wood Stain
Step 2: Utilize the Wood
The gun cabinet you’re making has the dimensions of 6 ft (height) x 4 ft (width) x 2 ft (depth). To make these dimensions, you’ll have to place plywood sheets on the floor and begin measuring. Use a tape measure and mark with a pencil for precise measurements.
Sides
The sides are 6 ft long and 2 ft across.
- Start from the bottom of one sheet of plywood and measure 6 ft upward. Mark it; this is the length of your cabinet.
- From the mark you drew, measure 4 ft across to the other long end of the plywood to mark the width. This is one side of your cabinet.
- Repeat measuring and marking the dimensions on another sheet of plywood. This is the other side of your cabinet. The same measurements mean you’ll have a symmetrical front and back cover for your cabinet.
Also, mark these measurements on two other sheets of plywood.
Top and Bottom
The top and bottom of your cabinet are both 4 ft long and 2 ft wide.
- Mark these on two other plywood sheets. These will make up the base so the cabinet stands and the top cover so it won’t be open on top.
Now that you’ve marked all the dimensions for all sides of the cabinet, you can now cut the wood and sand raw edges. The easiest way to cut through your plywood accurately is with a table saw.
Tip: Take the most time in this step. All the other steps hereafter can only be done with the accurate measurements and proper cutting of the wood.

Step 3: Make a Cabinet Frame
Out of the two pieces you’ve cut for the front and back, choose one for each. Unless you’re not putting your gun case against the wall, you’d want the nicer-looking plywood to be in front as it will be the visible side. Set the front plywood aside.
Screw in Side Panels
Find the other piece, which is the backing of your cabinet. Next, set and install a side panel flush against the back piece so that only their edges touch. Every six inches, screw in the side panel in place. Do this to the opposite edge.
Screw in the Top and Base
For the top and bottom panels, you’ll have to cut their length so that they won’t overlap with the side panels. This simple but often overlooked step can get you in trouble if you don’t account for it.
Proceed to glue the remaining piece of wood six inches below the top. These will serve as the , so they will stand upright and not lean to the sides.Once you’ve installed the door, make sure to across the hinges to prevent you weapons from getting into the wrong hands.
- Measure the width of the plywood itself, and double that number. That measurement will be the amount you’ll deduct from the overall measurement from the top and bottom plywood pieces.
- Make sure you’re cutting the length and not the width. The edges of your top and bottom panels should now be flat against the edges of the side panels and the back plywood.
- Screw the top and bottom panels to the back every 2 ft. and every 1 ft. to the side panels.
You now have a sturdy frame for the gun cabinet. It’s an almost complete cabinet if not for the missing front cover. This is where the door will be.
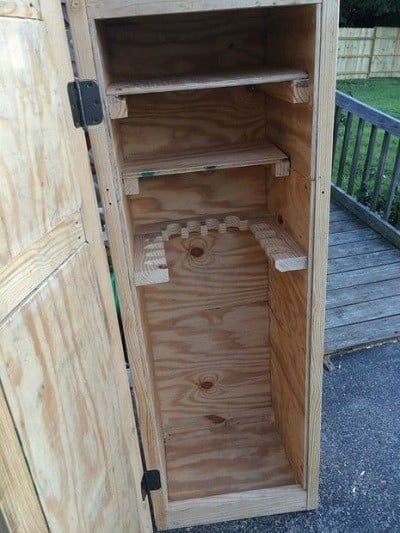
Step 4: Cut Wood for the Gun Holders
After making a frame, you need a place to hold your firearms! On two pieces of wood with the same depth of 2 ft, measure and cut each one with the dimensions of 2 ft for the length x 6 in for the width.
On the cabinet’s interior, glue one of the two pieces six inches from the base so it can be used as a shelf. For the other piece of wood, cut at most six 1 in x 1 in notches to hold the barrel of the guns.
Proceed to glue the remaining piece of wood six inches below the top. These will serve as the main storage option for your guns, so they will stand upright and not lean to the sides.
Step 5: Install the Door
There are quite a few steps to installing the door. For this DIY gun case that I’m making, you will have a glass-front door. I love how classy it makes the entire cabinet look. However, if you want to use the plywood I cut from the first step as a solid cover, just apply the same steps below to your piece of plywood.
Attach the Hinges
The hinges must be installed first, so the door locks securely. You can pick up a great set of stylish hinges at your local home improvement store.
There should be two hinges on one edge of the cabinet frame — each one six inches away from the the top and bottom.
Take the front plywood I set aside a while ago. Measure four inches from all the edges, then connect all the marks until you have a large rectangle in the middle. Cut along the lines to transform the solid plywood into a frame for the glass.
Attach the Plexiglass
Next, you’ll need to measure plexiglass that will display your guns. Your plexiglass must have the same dimensions as the wooden front (6 ft x 4 ft x 2 ft). If it needs to be cut, you can use a simple saw like a jigsaw.
Glue it to the sides of the wooden frame. Or, glue glass retainer clips to the edges. Turn the door around so the wooden frame faces outwards and secure it to the hinges.
Once you’ve installed the door, make sure to add in a safety lock to the side across the hinges to prevent you weapons from getting into the wrong hands.

Step 6: Sanding and Painting
After installing the door, you really should sand your gun cabinet. Sanding wood eliminates splinters and other potential issues. It also gives you a much nicer look and finish to the gun storage cabinet you made.
While you can choose any color as paint, stick to unsuspecting neutral colors so the cabinet blends in the background. You don’t want .
- Sand down each side of the cabinet including the interiors, the shelf and the gun holders until you achieve the desired result. Once completed, you are ready to give your cabinet a paint job!
- When painting, make sure to start with a primer before the actual color. Add an extra layer of coating to even out the color. This additional coating also gives your cabinet a glossy finish and prevents it from getting damaged.
- While you can choose any color as paint, stick to unsuspecting neutral colors so the cabinet blends in the background. You don’t want home intruders noticing it’s there.
Step 7: Add Caulk to Your Safe
Caulking is used to protect homes and windows from insects and air. Buy caulk and place it on any exposed sides to extend your cabinet’s lifespan. Give your cabinet a minimum of 24 hours to dry.
My last step requires you to waterproof your new gun case. Your safe becomes exposed to dangers such as insects, moisture, and bacteria. These threats tamper with the interior and exterior of your cabinet, so make sure to add in a top quality dehumidifier for gun cabinets.
In this case, the cabinet should protect the guns from possible damage from external factors.
Therefore your cabinet should also be protected against these hazards.
On some occasions, your guns can get destroyed and damaged because of environmental issues.
Even the best safes for handguns are at risk of environmental factors such as moisture and humidity, so make sure you get this step done right away.
Congratulations, you just learned how to build a gun cabinet!
You can also add lights inside the case to brighten up the interior of your safe. If you want to go ahead and build a gun safe room, you can check my how to guide here.
Example Materials of DIY Gun Cabinet
| Materials | Design |
|---|---|
| 4 pieces of 2×2 lumber | Legs |
| 2 pieces of 3/4 inch plywood | Panels |
| 8 pieces of 1×2 lumber | Cleats |
| 4 pieces of 1×2 lumber | Cleats |
| 2 pieces of 3/4 inch plywood | Shelves |
| 1 piece of 3/4 inch plywood | Top |
| 1 piece of 3/4 inch plywood | Door |
Related Questions
What Kind of Wood Is Used for Gun Cabinets?
Oak is the most commonly used in gun cabinets. The reason is that it is readily available worldwide and durable.
Are Gun Cabinets Worth It?
Gun cabinets are worth it if you’re planning to keep guns for the long term. Gun cabinets can last for years and even decades.
How Deep Should a Gun Cabinet Be?
It depends on what guns you are going to keep. DIY gun cabinets allow you to decide what dimensions to build so that they can fit your guns comfortably.

Conclusion
If you own one or several guns, then you need a gun cabinet. They offer protection for you, your guns, and those around you. Don’t let budget or preference stop you from getting the gun cabinet you want, though. Even a simple a DIY cabinet made of plastic or resin might get the desired result. If you’re concerned about durability, remember that pool balls are made of resin and it’s usually cheaper than many materials.
To help extend it’s life, clean your wood cabinet regularly for both appearance and functionality.
Making a cabinet requires some effort. Keep your new cabinet in a safe place to prevent outside threats from tampering with your new safe.